Speak with a real person (775) 746-4887 (8:00 AM - 6:00 PM Pacific Time)
Free domestic shipping on orders over $250.00

Why Header Wraps Destroy Headers

And Why Thermal Ceramic Coatings are Recommended

We are regularly asked or have commented on the use of header wraps (header tape, thermal tape, heat tape) on exhaust header systems. This issue is a real pet peeve of mine. Good or bad about a product I will give my opinion based upon direct use and fact, and this stuff screams “Do Not Use on Exhaust Headers!”

The Facts

  • Header wraps are designed to keep the heat in the header to improve scavenging of the cylinders. Keeping the heat in the header allows the exhaust speed to remain high. (the right idea)
  • Header wraps, by keeping the heat in the header, also reduces the radiant heat in the engine bay.
  • There are no header manufacturers that I know of who will warranty their headers if header wrap has been installed on their products. This includes partial installations of the header tape on certain tubes or sections.
  • In most cases, the header wrap damages the headers beyond repair. (I will explain below)
  • If you run a lean mixture, you “may” see a slim performance gain using header wraps. A rich mixture may show slim to absolutely NO gain in performance.
  • If replacing your headers and header gaskets regularly does not bother your wallet or your time, and you like that ugly look of a wrapped header, go ahead and use the heat wrap.

Background Information

In the past, almost all NASCAR and other racing engine builders and crew chiefs used header wraps for the added power gains and thermal control benefits offered by their use. Problems occurred when these same teams had to replace the headers after just a few races (NASCAR) due to the wrap becoming about the only thing holding each header together. Most engine builders, crew chiefs, and definitely the header manufacturers themselves do not promote the practice of installing these wraps directly on the headers! Technological advancements in chemicals and metallurgy have shifted toward the use of thermal ceramic coatings that are chemically and electrically applied to the header material. Popular header coating services include Airborn, Jet Hot, HPC, and some header manufacturers (Sanderson Headers for example) now apply these thermal coatings in-house.
 
Imagine having to replace a $3000.00+ set of headers after just a few race weekends! Few but the most financially well-off race teams can afford to do this. Also consider the labor and amount of time required to duplicate a custom set of headers. These headers are not assembled from tubes programmed into a bender, they are made one tube at a time, and usually consisting of 3-4 or more individual tubing sections welded together for each tube. Most custom header manufacturers do not have copies of designs readily available.
 
The wraps are good in protecting various underhood ‘items’ from heat, but not for the use of holding the heat in the header itself. For example: use the thermal wrap to enclose and protect fuel and oil lines, wiring, covering a starter motor, etc.
 
Cool air needs to be around the header, and insulating it with a wrap to hold exhaust heat in makes the header material surface temperatures reach near molten levels. Wrapping the header traps the expansive heat between the header surface and the wrap, but also suffocates a material application that needs to breathe to dissipate heat for its own survival.
 
Engineers, Metallurgists, and other experts out there will state that there is no way that the material can fail because it was designed to withstand the internal temperatures of exhaust gases. This is very true! However, when the header is not allowed to cool (or breathe) so as to dissipate those extreme temperatures that the wrap is controlling, it now develops a heat absorption response that compares to thermal friction. As the header heats up and expands, stretching the header wrap slightly, it allows a slight gap when the header cools. This area, even though very small can now condensate (sweat). This causes temperatures to continue to rise beyond the normal exhaust gas temperatures (EGT’s) the header material was designed to withstand. This holds true as with most any type insulation.
 
Try this experiment the next time you launder a load of bath towels and then dry them. Immediately pull them out of the dryer and just toss them in a snug pile on your bed. Now leave them there for many hours, even a day, and then open them. You will find that there is still a considerable amount of heat left in the center towels. This heat, even though the outer towels and bed are normal room temperature have been able to contain their heat. This is a simple thermal insulation test, but compared to your headers you have an internal heat supply constantly coming from the engine when running. The freshly dried bath towels do not need to breathe, your header material does.
 
The heat on the outside portion of the header material is trapped between the wrap, and the small amounts of moisture that develop will soon cause the header to fatigue. This build-up of heat and moisture is amplified by the wrap. When this moisture heats up, trapped between the heat source (header) and the wrap, it superheats. Another related example is the condensation that builds in a vehicle’s exhaust piping. How often do we wake up on a cool morning and see the steam coming out of the exhaust pipes of our own and other vehicles? Small amounts of moisture from the air have been drawn into the cooling exhaust piping and is now being burnt off the next morning. This is not usually an issue because it burns off. In extreme cases, the regular moisture can cause the exhaust piping to rust out. It is for this reason (attempts to keep moisture from developing between the header and wrap) that the header wrap manufacturers state that a tight, secure installation of the wrap is imperative. However, it will never be tight enough to prevent moisture from being drawn in!
 
Although the EGTs inside the header basically stay the same by the tune of the engine and use, the properties of the header material changes by amplifying the temperature from the insulation and collected moisture. This action goes against normal laws of thermal dynamics, but this effect is a fact, and you have to pull the ears off some engineers before they believe you. This is the trouble with a great education, but lacking in something that is often just as important — “common sense”! If you decide not to believe these statements that is your choice. Go ahead and install the header tape on your headers, and we’ll be happy to sell you a new header set!

Temperature Readings, Taken at Daytona Motor Speedway

Below are the test parameters and results using both Jet-Hot Coatings® coated and uncoated headers from some years ago:
 
(10 Laps; the same engine and car with identical headers; one header set is uncoated, one header is Jet Hot® coated. The engine is operated between 6,900 and 7,500 RPM, and temperatures are measured immediately after the last lap with the engine idling at 2,000 RPM with identical sustained EGT’s of 850º F.)
Measure Location: JET-HOT® Coated No Coating Coated Difference
1.0" From Engine 300°F, (149°C) 750°F, (399°C) -450°F, (-232°C)
2.0" Above header tube 210°F. (99°C) 300°F, (149°C) -90°F, (-32°C)
1.0" Above Floor Pan (inside vehicle) 115°F, (46°C) 165°F, (74°C) -50°F, (-10°C)

Pretty impressive improvement in temperature reduction! With any coating it is important to not damage the coating. The thermal coating becomes part of the header material. Most of the other coating brands are comparable to these figures —as long as they are multi-layer, applied both inside and outside of the tubes and using proper materials. NOTE: Most “inside” tube coating applications will not cover the entire inside of each tube, as they are limited by the length of the application wand. This is not a problem.

Something Most Racers/Car Owners Don't Realize

Headers Oxidize!

Under normal use, and even more so with higher EGTs and header surface temperatures, every header will oxidize, and small amounts of material is actually removed from the headers over time. This means that uncoated headers will become lighter and weaker over time.
 
Examine these actual test numbers:
  • Mild Steel (1010) uncoated header exposed to continuous 1200º F. in normal air will have a weight loss percentage of roughly 25% with only 10 hours use at this temperature.
  • Stainless Steel (410) uncoated header will have roughly 8% weight loss in the same 10 hour period.
  • A coated mild steel header will have NO weight loss at temperatures up to 1200º F. In fact it will actually gain a bit of weight! Between 1300º F and 1600º F the coating will begin to show signs of mud cracking or like the look of lacquer checking. However, limited diffusion takes place between the coating and the substrate, producing a very thin film of iron aluminide, which continues to inhibit oxidation.
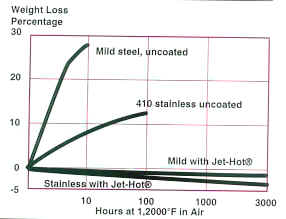
Exhaust header oxidation graph

Now, consider the information provided above and the added thermal stress generated by the header wraps. What do you see? Remember that the wrapped metal cannot cool properly and the header wrap is causing the material to super-heat and leads to premature component failure!

Side Note: Step Headers

Understanding the physics of exhaust flow in regards to step-headers?

Step headers are designed to allow controlled and efficient exhaust gas expansion within a selected engine RPM range. What does this mean? As exhaust gases are exiting the cylinder head exhaust ports and into the header they are still burning, and these gases are rapidly expanding down the primary tubes. In fact, they are “pulsing”. If the header is designed to take advantage of the pulse expansions of the exhaust gases, gains in horsepower and torque will occur. However, this needs to be done right and with proper research and scinece, or else that $1500.00 or more set of custom step headers is a big waste of money. When designing a step header, it is important to know where maximum power is needed, and since each step header is often RPM-specific to each engine combination.

DEFINITION: A “STEP” is an increase in primary tube diameter.

Here is an example:
 
A basic Chevrolet 350 cubic inch engine:  3.48″ stroke, 5.7″ connecting rod length, 4.0″ bore, 10.5:1 compression ratio, standard 2.02″ / 1.60″ Intake/exhaust valves; designed for 6500 RPM operation. Cam specs are: .500″ lift, 235º duration @ .050″ lift, 112º lobe centerline.
 
For the average Joe Bracket Racer this would be a standard 1-5/8″ or 1-3/4″ primary header primary tube size, depending on vehicle weight, gearing, transmission type, and where you want your power. Here is the “exact” header size for a racing engine operating at 6500 RPM. Note: This is for max power at 6500 RPM!
Header Type Primary Tube Diameter Primary Step Length Second Step Diameter Second Step Length Third Step Diameter Third Step Length
Single Size Tubing 1.757" 31.9" - 34.4" ----- ----- ----- -----
2-Step Header 1.757" 14.0" - 16.5" 1.882" 15.4" - 17.9" ----- -----
3-Step Header 1.632" 14.0" - 16.5" 1.757" 6.8" - 9.3" 1.882" 6.1" - 8.6"

Collector Specs:

3.221″ Diameter with a 18.0: to 23.0″ length (2nd best = 9.0: to 11.5″ length)

Acoustical Tuning Specs:

    • best wave = (- negative pressure) = 5,000 – 6,000 RPMs
    • bad wave = (+ positive pressure) = 2,018 – 3,518 RPMs
    • wav-lag degrees = 3.2º – 6.3º

This is a “Optimized” header design for an engine operating primarily at or near 6,500 RPM, or an engine that makes its peak horsepower at ~6,500 RPM.
 
The reason for adding the above step-header specs was to explain that exhaust headers have areas where the expansive exhaust gases compress when passing through the header tubing. Stated differently, pointing out where exhaust gases are not allowed to expand. As we all know, the compression of air, or in this case, compression (or restriction) of exhaust gases, will generate heat. Anywhere that a step (increase in tubing size) is not properly located will see an increase in heat.
 
Of course there is no “Perfect” header design unless the engine was to never change RPM. With an internal combustion engine that has an operating range from idle to well over 6,000, 8,000 or even 10,000 RPM, there is no specific header that is best for an entire power band. Setting up the step header requires a choice, based upon the RPM where the engine will spend the most operating time.
 
It is possible to call this compression of exhaust gases (or restriction) that of thermal dynamic friction. However, we cannot have true friction from a gas against a solid, but we can state that the compressed exhaust gases are a source of additional exhaust heat.

Experiencing the Negative Effects of Header Wraps

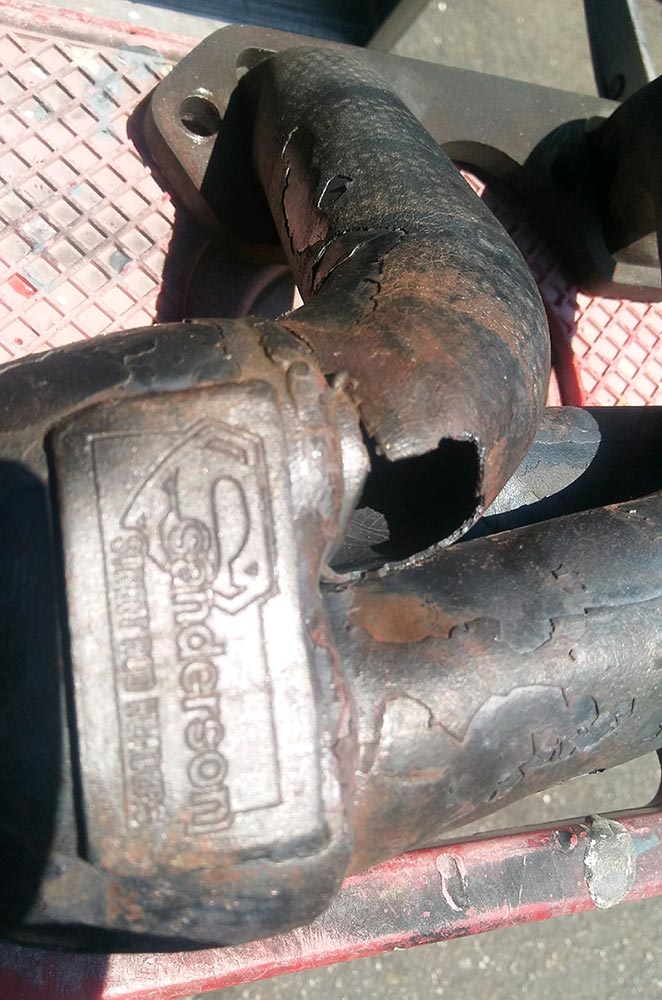
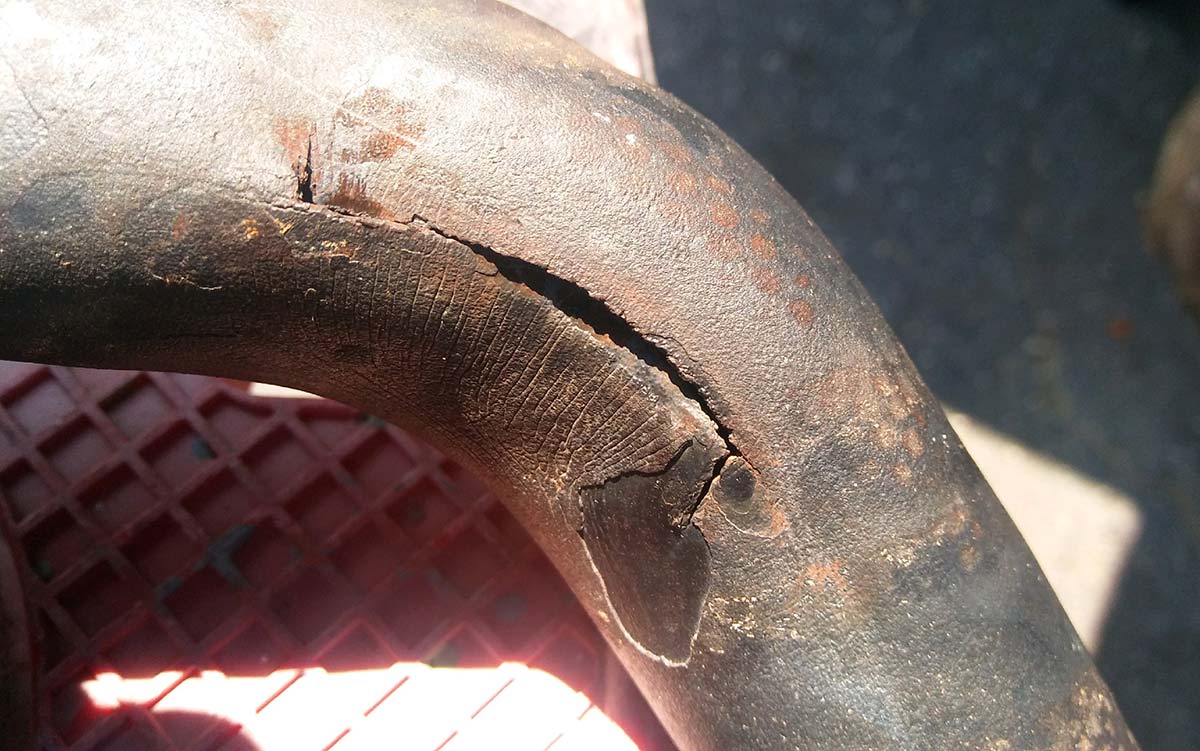
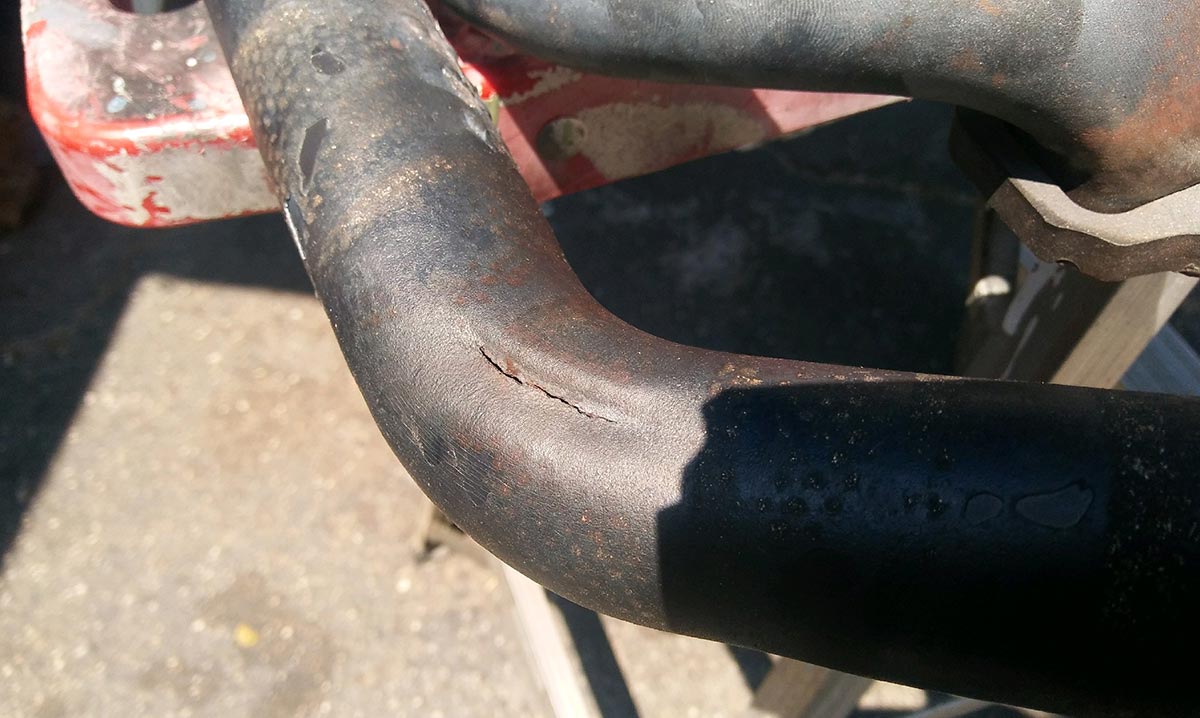
Because of the expanding exhaust gases, if you have had the experience (as I have) to see first hand what header wrap has done to a header (a few example images provided below), you would notice the locations on a header where the material failures occur. This is typically where a step (in a step header) would be located, or where there is an expansion pulse of exhaust gases inside the header tube. I have held headers in my hands where literally the only thing keeping the header in one piece was the wrap. Whole chunks of the header material was gone, simply melted away. If you were to speak to some “engineers” (I use that title with caution) they will probably tell you that aliens stole the metal as the car was racing around the track! They say this because the conclusion that the wrap is causing problems is not part of normal metallurgy and thermal dynamics theory. The header wrap allows temperatures between the wrap and the header (explained above) to turn the material molten. Once molten it can separate.

Here are a few examples of what happens to a header using tape / thermal wrap:

This particular customer initially claimed, when requesting warranty replacement, that he did not use header wraps. The tape wrap marks on the header clearly show that was not the truth.

Have questions regarding this information?

Our Online Support HelpDesk is available 24-Hours a day, 7-Days a week to assist you.

Or, call our dedicated support staff at (775) 746-4887

Phone support available between 8:00 am and 6:00 pm, Mon-Fri
Click Here for our HelpDesk