Speak with a real person (775) 746-4887 (8:00 AM - 6:00 PM Pacific Time)
Free domestic shipping on orders over $250.00

Cooling System Basics

For Internal Combustion Engines

Modern automotive internal combustion engines generate a tremendous amount of heat. This heat is created when the gasoline and air mixture is ignited in the combustion chamber, and also from friction heat. The ignition (explosion) of the air/fuel mixture causes the piston to be forced down inside the engine, levering the connecting rods, and turning the crankshaft — creating power. Metal temperatures around the combustion chamber can exceed 1,000° F. (538° C.). In order to prevent the overheating of the engine oil, cylinder walls, pistons, valves, and other components from these extreme temperatures, it is necessary to effectively dispose of the heat.

Others have stated that the typical, average-sized vehicle can generate enough heat to keep a 5-room house comfortably warm during zero degree weather temperatures (and I’m not talking about using the exhaust pipe). Approximately 1/3 of the heat created during combustion is converted into power to drive the vehicle and its accessories – that presents quite a bit of wasted energy!
 
It is our goal as racers to bring that 1/3 to a much higher standard, making use of every bit of energy created to accelerate our vehicles. But this higher standard and improved performance benefit causes even greater heat generation, requiring improved cooling system components and designs to better dissipate the energy by-product known as heat.
 
With only a third of the heat created used as energy (power), another third of the heat is carried off into the atmosphere through the exhaust system. The remaining third must be removed from the engine by the cooling system. Modern automotive engines have replaced the Air Cooled System (Volkswagen, Porsche, Chevy Corvair, and others) for the more effective Liquid Cooled System to handle the job of removing the heat.

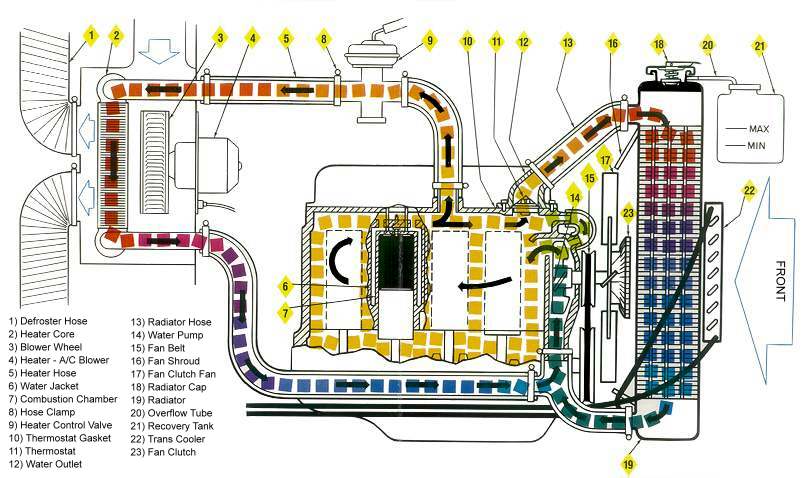
In a liquid cooled system, heat is carried away by the use of a heat absorbing coolant (water and antifreeze mix) that circulates through the engine, especially around the combustion chamber in the cylinder head area of the engine block. The coolant is pumped through the engine, absorbing the heat of combustion and then circulated through the radiator where the heat is transferred to the atmosphere. The cooled liquid is then transferred back into the engine to repeat the process.

(click image at right to enlarge)

Automotive cooling system water flow graphic and components

In the automotive system, the coolant is circulated by the water pump, and the thermostat controls the temperature — or more correctly, the thermostat controls when the water flows through the system, and how long the heated water is allowed to transfer the heat into the atmosphere. The thermostat is closed when the engine is cold, allowing coolant to circulate ONLY in the engine block, bypassing the thermostat and radiator. This allows the engine to warm up faster and uniformly so that “hot spots” are eliminated. When the warming coolant reaches the thermostat’s rated temperature, the thermostat will begin to open and allow coolant to pass to the radiator. The hotter the coolant gets, the more the thermostat opens until it reaches its maximum opening dimension, allowing more volume of water to pass to the radiator. The thermostat also controls the length of time that the coolant remains in the radiator so that the heat is dissipated effectively. This is VERY IMPORTANT!  DO NOT RUN YOUR ENGINE WITHOUT A THERMOSTAT — EVER! On a racing application you can get by without a thermostat by using the correct restrictor disc installed where the thermostat would normally be installed. Selecting the correct restrictor is imperative to system efficiency.

IMPORTANT WARNING: 
Removing the thermostat to increase water flow because your vehicle is overheating is dangerous to your engine and is NOT something you want to do. This causes two problems. First, the engine will take longer to warm up, causing excessive metal-to-metal wear. Second, once the engine does warm up it can get too hot because the thermostat also controls the length of time that the water stays in the radiator, dissipating heat to the atmosphere.

Your engine will overheat for a variety of reasons, and removing the thermostat to improve flow is NOT AN OPTION. If the water passes too quickly through the radiator it does not have adequate time for heat to be absorbed by the metal cores of the radiator and passed to the atmosphere. This increases the likelihood of overheating, amplifying other problems by running the engine without a thermostat!
 

The Pressurized System

Up until the late 1950’s, liquid cooled systems did not operate under pressure. This was primarily because these vehicles were built with considerably larger radiators than vehicles of the modern era. There was also more open air (space) under the hood and in the engine bay, allowing for more natural heat dissipation. These older engines also had richer fuel mixtures causing lower (and less efficient) combustion temperatures. With the manufacture of smaller vehicles, using smaller radiators, larger engines, the introduction of emission controls, along with the current use of unleaded fuels—more efficient cooling efficiency became necessary. We now see very high horsepower applications that increase the need for highly efficient, pressurized cooling systems.
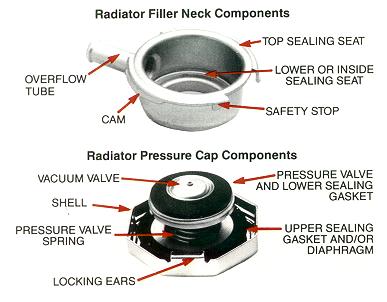
Automotive radiator cap image and component identification

The cure for these gains in performance and tighter engine bay dimensions was to operate the cooling system under pressure, thus isolating it from atmospheric pressure. A system under pressure can handle much higher temperatures, and offers the benefit of a higher static boiling point.

 
NOTE: For every pound of pressure exerted on the coolant in the system, the static boiling point of the coolant is raised by approximately three degrees! Pressure is important.
 
Most liquids have a specific “boiling point” in which the temperature of the liquid begins to change into a gas. If pressure is applied to the liquid it must become hotter before it can boil. Pure water in a cooling system will boil (at sea level) at 212° F. (100° C.). At higher altitudes the atmospheric pressure is less than at sea level. Example: Water at 5,280 feet will boil at a mere 203° F. (95° C.). Hoverver, a cooling system that is under 15 pounds of pressure will now allow the water to reach nearly 250° F. (121° C.) before it begins to boil. Even at this temperature the water is able to circulate through the engine, cooling parts that are at a much higher temperature without the water boiling. As long as the coolant remains in liquid form the system can do its job and transfer heat to the radiator which is then dissipated into the atmosphere. Coolant that is boiling cannot transfer as much heat and engine overheating is likely to occur as the coolant turns to a gaseous state. Steam adjacent to a hot surface such as a combustion wall can actually act as an insulator – thus preventing any heat transfer to the coolant.
 
Pressurization of the system is achieved by a special radiator filler neck and radiator pressure cap. The filler neck has an upper and lower sealing seat with an overflow tube connection between them. The lower seat is engaged by the pressure controlling valve on the cap and the upper seat (in an open system) is engaged by a spring metal diaphragm in the cap. The radiator pressure cap features a spring pressure relief valve which closes off the lower sealing seat in the filler neck. This pressure relief valve allows pressure to build up to a specified level, the permits excess pressure to escape through the overflow tube when it exceeds the range of the pressure valve spring. This valve protects the cooling system from damage from excessive pressure. This pressure relief system also includes a vacuum relief valve that allows air (in an open system) to enter as coolant contracts. This prevents the radiator hoses and tanks from collapsing from the partial vacuum that would be created if air was unable to enter.

THE CLOSED (RESERVOIR SYSTEM) versus THE "OLD STYLE" OPEN SYSTEM
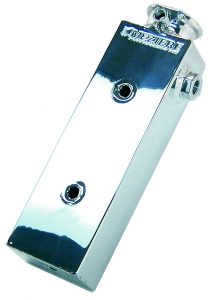
Meziere WE100 Overflow

One of the big disadvantages in the old open type unpressurized system is that as the system cools, air is allowed back through the overflow tube. These systems are not totally filled with coolant because of the potential for coolant loss through the overflow tube when the coolant heats up and expands. As more coolant is lost through the overflow, sometimes into an overflow tank, less coolant is left to do its job within the engine. Because of this reduced capacity, and that air can enter the system and reduce cooling system efficiency, overheating can occur more easily. Closed reservoir systems were first used by car manufacturers in the early 1970’s.

A closed or reservoir system has solved the problems listed above. This system is different in that a special radiator cap and overflow reservoir tank is utilized. Part of the radiator cap is a second sealing gasket under the shell that contacts the upper sealing seat of the filler neck. What was the overflow hose is now the connection between the radiator and the “bottom” of the reservoir (or at least a top-connected tube that reaches to the bottom of the reservoir).
The open pressurized system is filled to a point 2-3 inches below the top of the radiator, and the closed pressurized system is filled completely with coolant, and the reservoir is filled approximately half full. When the engine is started and begins to heat up, the coolant expands. As the coolant expands it is forced out out through the pressure valve of the radiator cap, through the overflow tube, and into the reservoir. When the engine is turned off and begins to cool, a partial vacuum is created in the radiator by the contracting coolant. The upper sealing gasket in the pressure cap will then allow the vacuum to draw the coolant back into the radiator and engine from the reservoir. As you may have noticed, the actual volume of coolant that is displaced during warm-up and cool-down transfer is minimal in most all cases.
 
Because the coolant is moving back and forth between the radiator and reservoir, practically all air is eliminated from the cooling system. This nearly guarantees that the engine block, heater core, and radiator are full of coolant instead of air. This allows the most efficient operation of the cooling system. Generally, on closed systems, coolant is added only as required, and then it is added to the reservoir, not the radiator. Modern vehicles do not want to to open the radiator cap at all! Unless a major service is being performed on the engine that affects the cooling system, we only need to be concerned with the reservoir, adding coolant as necessary.

COOLANT and COOLANT ADDITIVES

Even though decades ago it was water alone that was used for many years in automotive cooling systems, the fact that it only has a 32° F. (0° C.) freezing point and a 212° F. (100° C.) boiling point; it evaporates easily; creates rust and corrosion within the engine; and leaves mineral deposits that can cause damage to moving components and reduce cooling efficiency, a water-only system is much less than optimal. It is much more efficient to utilize a chemical (or combination of chemicals) added to the water to improve the efficiency of the coolant. This chemical is commonly called “Antifreeze”, but the more accurate name is ethylene glycol (EG). In recent years (EG) has been replaced by propylene glycol (PG). This is a much less dangerous chemical. Most antifreeze still has some distilled water in it, as well as a type of alcohol in its composition.
 
PLEASE READ:
Antifreeze is considered by many to be “one-size-fits-all” as most antifreeze brands have a distinctive lemon-lime or red color. However, the actual formulations can vary greatly between types, such as the more recent RED antifreeze. Conventional antifreeze is formulated from an ethylene glycol (EG) base chemical and can have very serious health risks.
 
It is estimated that each year 90,000 pets and other wildlife die from accidentally ingesting ethylene glycol based antifreeze. Animals are attracted to antifreeze for its sweet smell and taste. Animals, and children for that matter, can accidentally ingest antifreeze from spills, cooling-system leaks or improperly stored containers. Because of this the U.S. Government has initiated strict laws and penalties as the result of contamination of water or ground areas. Even a leaky vehicle can get you into trouble.
 
As an alternative, automotive chemical manufacturers have formulated a newer type of antifreeze using propylene glycol (PG) instead of ethylene glycol, which is less harmful if accidentally ingested. A popular brand is SIERRA by Peak, which was the first nationally marketed propylene glycol based antifreeze.
 
Safer, propylene glycol based antifreeze provides performance and protection comparable to conventional ethylene glycol based antifreeze in four key areas of engine protection: boil over, freeze-up, corrosion and heat transfer. SIERRA, and other propylene glycol based antifreeze products are available nationwide, and can be the extra margin of safety to protect your children, pets, drinking water, and neighborhood wildlife. Glycerol is also being re-evaluated for automotive antifreeze. Glycerol was once used in automotive applications, is non-toxic, and is often used in various pharmaceutical formulations. Although glycerol does not have the exact range of freezing and boiling point as currently used antifreeze, it has other benefits, especially in its non-toxicity.
 
Since antifreeze as a 50-50 mix with water elevates the boiling point to 227° F. (108° C.), and lowers the freezing point to -27° F. (-33° C.), it could also be called anti-boil, and often is. Good quality antifreeze contains water pump lubricants to help maintain the efficiency of the pump, rust inhibitors to keep unwanted deposits from forming, and acid neutralizers to help protect the inside of the radiator, heater core, and hoses from corrosion. Modern sealed cooling systems enhance the reduction in contaminants by reducing air that may enter the system.
 
Of course, antifreeze does not last forever, so it is recommended that the coolant be changed at least every two to three years or 24-36,000 miles on older cars (pre-1990), 45-50,000 miles on vehicles built through the late 1990’s, and newer vehicles using OAT (Organic Acid Technology) or LLC (Long Life Coolant) can go up to 5 years or 150,000 miles. However, many vehicle owners of older cars do not follow this service interval and allow their cooling systems to become rusty, dirty, or clogged with mineral deposits. This causes water pump and hose failures, poor performance, overheating, and other component failures. To eliminate these problems it is best to have your vehicle’s cooling system flushed in a professional shop that flushes and filters the coolant in your engine using equipment that is not only effective, but environmentally safe. The old way of simply using a flush kit with a water hose is illegal in many states and districts, and should not be attempted if you give a care about your family and the environment around you.
 
Over time leaks can develop in the cooling system. If these leaks are not corrected you will lose excessive coolant and allow air into the system which can cause overheating and engine damage. Although many leaks can be fixed as easily as tightening a hose clamp, in many cases you may still need to replace hoses, the water pump, various gaskets, or even the radiator or heater core may require repair or replacement. Some chemical additives call “stop leaks” or “sealers” have been developed to stop some minor leaks from inside the cooling system. Most chemical sealers are derived from solutions which contain thousands of small particles that upon coming in contact with the leak will collect in sufficient quantity to where they clot up and stop the leak. These chemical sealers should only be used as a short term fix in certain circumstances, but can be quite effective. Just remember to only use them in moderation. Excessive use can cause other problems and they do not seal all leaks. IT IS NOT RECOMMENDED TO USE THESE BAND-AID SEALERS IN A MODERN VEHICLE APPLICATION. You may cause more damage than you expect. Proper maintenance and repair is more vital on new vehicles, and these quick fixes may hurt your wallet later.

The Radiator Cap

The radiator pressure cap can be considered the safety valve of the cooling system. The pressure cap is comprised of:
  • A top shell with two ears for engagement with the filler neck cams
  • A spring disc diaphragm (and upper sealing gasket) to seal against the top of the filler neck and to provide friction to hold the cap on the neck
  • A stainless steel pressure valve spring and pressure valve to seal against the bottom sealing seat of the filler neck
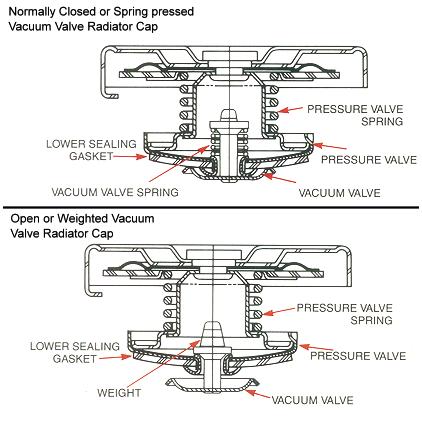
  • Centered in the pressure valve is a vacuum relief valve (some are normally closed, while others are in a weighted-open position).
 
The radiator filler neck’s top sealing seat allows the cap’s spring diaphragm to exert enough pressure to hold the cap on the neck. On the closed system, atmospheric pressure is sealed by the cap’s upper gasket at this point. The lower sealing seat is where the pressure valve rests, permitting pressure to build as the coolant gets hotter.
Radiator pressure cap components and styles
The filler neck cams are for the purpose of holding the cap in place, but also pressing the pressure valve onto the filler neck with exactly the right amount of preload. The filler neck cams also have a safety stop to prevent vibration from loosening the cap or causing a loss of system pressure. It also works as a limited safety from serious burns during cap removal on a hot or warm engine. This why you must “push and turn” to release the cap from its fully installed (closed) position.
 
The radiator cap should never be removed when the cap or radiator are hot to the touch. There is sufficient pressure in the system at this point that serious burn injury and scalding may occur. ON MODERN VEHICLES YOU SHOULD NEVER HAVE TO OPEN THE RADIATOR CAP ITSELF – PERFORM ALL FILLING ACTIVITIES AT THE RESERVOIR. The cap on a modern pressurized system reservoir is also hot and under pressure – BEWARE!
 
The radiator should be allowed to cool or be force-cooled by spraying water on the radiator core. Always be sure that when you perform this procedure that the overflow cap is either removed, loosened, or the overflow tube should be “open” so that steam has a place to exit. Once the radiator has sufficiently cooled, take a rag or towel and place it over the cap to protect your hand. CAREFULLY turn the cap counter-clockwise 1/4 turn ONLY until it contacts the safety stop. Carefully observe for any coolant or steam loss around the rim of the cap and from the radiator overflow tube. Let that cap remain in this position until the pressure subsides. If too much coolant is exiting and there is still substantial pressure, you can try to close the cap and wait a while longer to where it has cooled enough to open safely. Once cooled and pressure has been released you can now press down on the cap and continue to turn it counter-clockwise and remove the cap. In a closed system the coolant level can be routinely checked in the reservoir, and coolant can be added as needed. Always protect yourself … hot engine coolant can easily scald your skin!
 
There are two types of vacuum relief valves made for radiator pressure caps. The Normally Closed (spring pressed) type, and the Normally Open (weighted) type. The normally closed cap design is what is called the constant pressure type cap. The vacuum is help in a closed position by a very light bronze spring. When the engine is started and begins to heat up, the system pressure starts to build up immediately because of the expansion of the coolant in the system. When the engine is stopped and begins to cool off, a partial vacuum tends to form in the system, which opens the vacuum valve to prevent the formation of excess vacuum in the system. The normally open type cap is what is called a pressure vent type cap. This vacuum valve hangs freely on the pressure valve and is equipped with a small calibrated weight. Under light operating conditions, the cooling system operates under no pressure (atmospheric). Should fast heating or overheating cause a quick expansion or boiling of the coolant, the escaping pressure or steam will activate the vacuum valve to close. The cap then operates the same as a constant pressure cap. When the engine is turned off and cools down, the vacuum valve again returns to the open position.
 
The pressure type (Normally Closed) radiator cap is the preferred design used by most automakers. Cooling system engineers prefer to have cooling system operating at atmospheric pressure as much as possible to prevent constant strain on the radiator, hoses, and water pump seals.

The Thermostat

The thermostat is the official sentry officer in the cooling system. The thermostat constantly monitors the temperature of the coolant and regulates the coolant flow through the radiator. Before the use of pressurized cooling systems, most thermostats were of the bellows type. They relied on a metallic bellows containing a few drops of volatile liquid (such as alcohol) which would expand at a certain temperature to open the thermostat valve. With the advent of of the pressurized cooling system, this bellows type thermostat became obsolete because the pressure in the cooling system prevented the bellows from opening at the correct temperature.
 
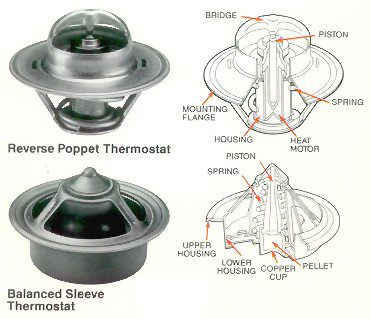
Modern thermostats are powered by a temperature-sensitive, positive pressure, heat motor. This is devised by using a specially formulated wax and powdered metal pellet tightly contained in a heat-conducting copper cup that is equipped with a piston inside a rubber boot. Heat causes the wax pellet to expand, which forces the piston outward and then opens the valve. This heat motor senses temperature changes and will move the valve position to control coolant flow, thereby controlling coolant temperature.
Automotive cooling system thermostat styles
The thermostat is usually installed at the front of the engine on top of the engine block, though on some import vehicles it could be just about anywhere. The thermostat fits into a recess in the engine where it will be exposed to hot coolant. The top of the thermostat is covered by the water outlet housing that is used to connect the radiator hose to the radiator.
 
There are two basic types of thermostats currently available: You have the balanced sleeve thermostat, and the reverse poppet thermostat. Both types function in the same manner, but have distinct differences. The reverse poppet thermostat opens against the flow of coolant from the water pump. The coolant, being under water pump pressure, is used to help the reverse poppet thermostat stay closed when it is cool so as to prevent leakage. The reverse poppet thermostat valve is self-aligning and self-cleaning. The balanced sleeve thermostat allows pressurized coolant to circulate around all of its moving parts. For a performance engine application it is recommended to use the reverse poppet design for it’s added flow capabilities.
 
Important Warning:
Yes, I’m going to say it again! Removing the thermostat to increase water flow because your vehicle is overheating is dangerous to your engine and is NOT what you want to do. Not only does the engine take longer to warm up, causing excessive metal-to-metal wear, but once the engine does warm up it can get too hot because the thermostat also controls the length of time that the water is in the radiator so as to dissipate the heat to the atmosphere.
 
The thermostat permits proper warming of the engine from a cold startup. A slow warm up causes moisture condensation in the combustion chambers which can find its way to the crankcase, causing sludge formation. The thermostat keeps the coolant temperatures above a specific minimum to provide proper engine combustion efficiency, extended engine life, and reduced combustion emissions. It also prevents the metal around the combustion chamber “hot spots” from overheating because it allows coolant to circulate internally within the engine before it opens.
 
Most engines are built with a coolant bypass for this purpose either as part of the internal engine design, or addressed externally by a hose or other component. Engines that utilize external bypasses are typically disabled by the thermostat once the thermostat has opened to force all coolant through the radiator. The thermostat must begin to open at a specified temperature for the application, and when fully open must permit adequate coolant flow. Typically the thermostat begins to open 3° to 4° F. (-16° C.) above or below its temperature rating. This means that a 180° F. (82° C.) thermostat will open between 176° F. and 184° F. (80° – 84° C.), and will be fully opened at about thenty degrees above its initial opening temperature. The thermostat must meet standards that include allowing a sufficient coolant flow when fully open, and leak no more than a specified amount when fully closed. Most current thermostats feature either a “bleed notch” or a “jiggle pin” that is designed to let trapped air in the system pass through the thermostat after refilling so as to eliminate hot spots during engine warm up.
 
Since 1971, most domestic car manufacturers have used 192° F. (89° C.) or 195° F. (91° C.) thermostats as original equipment. This permits the engine to operate at a higher temperature, which allows the cooling system to operate at its best efficiency and to reduce engine emissions. On performance applications it is sometimes effective to go to a lower temperature rated thermostat so as to compensate for the added power output from the engine modifications. But you must be very careful when using lower thermostat ratings on computer-controlled engine applications. Because the computer relies on pre-programmed variables that are calculated by engine coolant temperatures as one of the variables, using a lower temperature thermostat without corresponding modifications to computer programming can cause problems.

The Water Outlet

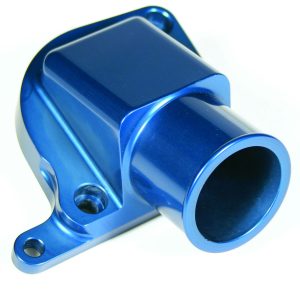
Meziere WN10019B water neck

The water outlet on the engine is the connection point between the engine and the upper radiator hose which passes hot coolant to the radiator. The water outlet typically covers and seals the thermostat, and in some cases includes a thermostat bypass. Most water outlets are made from cast iron, cast aluminum, or stamped steel. If you decide to install a chrome water outlet, make sure you use one with a machined-in groove for a sealing o-ring. Otherwise, the smooth chrome facing on the water outlet will not allow proper sealing and leaks will occur. It is actually better to utilize an aftermarket anodized billet aluminum, or a cast iron version (when available). These offer the best overall sealing. If all you have is a stamped steel or cast aluminum housing, you will just have to make do and expect periodic leaks that will need to be repaired by gasket replacement or sometimes replacing the water outlet itself.

NOTE: Cast iron and anodized billet aluminum are the best at resisting corrosion from the coolant and natural mineral deposits created in the cooling system. One of the most common leaks is caused by over-tightening, or uneven tightening of the water outlet mounting bolts. Being careful to correctly tighten the mounting bolts is the best way to prevent this.

The Radiator

The obvious function of the radiator is to lower the temperature of the coolant from the engine by transferring that heat to the atmosphere. The radiator is made of small tubes in “rows” called the “core” that are either positioned vertically (on older vehicles), or the more common horizontal design (called a cross flow) that is in all newer vehicles. At the each end of the core is a “tank.” One is the called the inlet tank and the other is called the outlet tank.
 
Factors that effect radiator efficiency include:
  • The basic design of the radiator (core thickness, number of rows, tank capacity)
  • The area and thickness of the radiator core that is exposed to cooling airflow
  • The amount of cooling air that is able to pass through
  • The difference between the temperature of the coolant and the temperature of the cooling air
  • Manual or automatic transmission (if automatic is the trans cooler radiator-integrated or separate?)
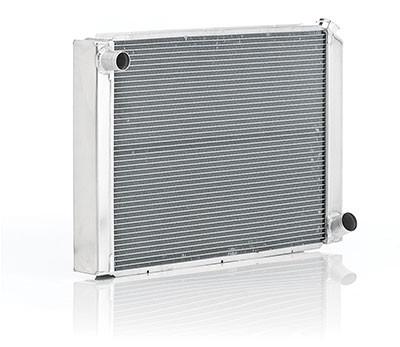
BeCool Qualifier Radiator
Surprisingly, the greatest factor that will increase the radiator’s efficiency is the difference between the coolant and cooling air temperatures. This can only be done by raising the temperature of the coolant. Doing this permits the use of a smaller radiator (now you know of another reason why newer vehicles run at higher temperatures, yet have smaller radiators than vehicles of the past). In a performance application we are constantly trying to find other ways to improve the radiator’s efficiency to compensate for the added heat generated from the higher horsepower output. Installing a larger radiator, a radiator with more rows, larger tanks, higher fin count, or better design are where we usually end up. But, we can also improve the airflow efficiency by adding a fan shroud, electric fans, and higher output water pump. Aluminum radiators are the choice of most racers, and should be your first choice if you must purchase a new radiator.
 
One other issue with radiator efficiency is on vehicles that have automatic transmissions. If this is you, and you have your OEM transmission lines still routed into your radiator for transmission fluid cooling, it is a very good idea to run a remote cooler for your transmission. Now, depending on your patience and vehicle knowledge, there are two issues you must understand. If you completely bypass the radiator and run your transmission fluid only in a separate cooler, it will take a bit longer for your transmission fluid to get to operating temperature. You will also need to plug the unused transmission line connectors in your radiator to prevent air that would get inside these passages and work against your cooling efficiency, possibly causing other problems. Just plug them and you should be OK.

Hose (Coolant Lines) and Hose Clamps (Fittings)

The upper and lower radiator hoses and heater hoses are all flexible connections between the engine, radiator, and heater core. Because of engine vibration, at least a partial flexible connection is mandatory between these areas. These hoses must be able to withstand the extreme heat environment under the hood of your vehicle as well as internal pressures up to and over 20 psi (pounds per square inch). Because of the wide temperature range of the coolant, they must also be compatible with below zero to over 250° F. (121° C.) temperatures without fail.
 
Air, coolant, and extreme temperatures all contribute to hose deterioration. Each one of these work against the life span of the hoses, causing the hoses to become hardened, cracked, softened, or swollen. Each result will damage the hoses’ flexibility and cause lining failure, rupturing, and clogging. Not only does this damage cause the hoses to fail, but rubber particles loosened from the hose linings can cause clogging in the radiator, heater core, engine passages, thermostat, and water pump. A weakened hose may collapse and cause restricted coolant flow and overheating. You must periodically inspect all coolant hoses for deterioration and flush the cooling system at required intervals to prevent these problems.
 
Hose clamps are used on every coolant connector on an original engine from the manufacturer. Most of the time these clamps are “one use” versions made of sprung steel that do not like being loosened and re-tightened. I recommend that many of these OEM style clamps be replaced if you are replacing or removing/installing coolant hoses. These OEM clamps can get bent or lose the concentricity that allows equal clamping force around the perimeter of the hose. These cheap spring metal clamps can also cut the hose when improperly tightened. If this happens, leaks and overheating are likely to occur. For performance and racing applications it is recommended that AN (Army-Navy) connections in conjunction with steel braided hoses be used. These fittings become an integral part of the hose and will thread into the braided hose’s rubber liner. The connection at the components and engine is also threaded to another fitting. This type of connection is the most reliable and longest lasting, but it is also considerably more expensive than basic hoses and clamps.

The Water Pump

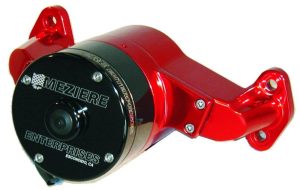
Meziere WP100R electric water pump
The water pump is obviously the heart of the cooling system. Just as your own heart pumps blood through your body, the water pump moves the coolant through your engine block’s water passages, hoses, and radiator.
 
In an automotive engine, an impeller type water pump is used. There is typically a cast iron impeller plate (on very old engines) that has fins, or a more typical stamped steel impeller attached to the pump shaft which forces the coolant out and away from the fins by centrifugal force as the impeller turns on the shaft. Performance water pumps will use a cast or billet aluminum impellers. The impeller is enclosed in the water pump housing with a provision for coolant entry into the pump from the lower radiator hose connected to the radiator, and exits into the engine block and the rest of the cooling system. The modern OEM water pump is turned by either a V-belt or serpentine belt system on the front of the engine.
Most water pump failures are caused by a combination of issues. Problems are first noticed by loud obnoxious noises or seeing coolant on the ground in the area under the pump. A damaged or worn out water pump may present itself by the presence or leaking of coolant out the “weep” hole at the bottom of the pump. The weep holes is a vent on the dry side chamber adjoining the bearing. When the coolant is leaking past the internal seal, past the lubricated shaft bearings, and into the dry chamber at the front of the pump, it will lend up leaking out of the weep hole. This is tell-tale to shaft, bearing, or housing failure and the pump needs to be replaced. Common causes of pump failure include:
  • An overtightened drive belt, causing side-loading on the pump shaft
  • Contaminants in the cooling system allowing components to rust and corrode
  • Excess air in the system, amplifying corrosion
  • Failure of another component that internally damaged the pump (lower radiator hose spring, thermostat)
Upgrading to a performance water pump is important for many applications. As we increase horsepower we need to find ways to assist in getting the wasted heat out efficiently and safely. For street/strip and drag racing applications one of the best choices available is to use an electric water pump.
 
For circle track, towing, or any application spending most of its time at upper RPM or high speeds, a high flow mechanical water pump is best. Quality electric water pumps, like those from Meziere (shown above), offer many performance benefits.
  • Overall weight reduction (considering belts, pulleys)
  • Higher flow levels
  • Increased performance (no wasted horsepower to drive the pump)
  • Between round cooling and faster cool-down (engine does not need to be running to circulate coolant)
  • Increased (and higher static) flow at all RPM levels, to the limits of the pump
  • Long life (corrosion-free)
  • Excellent looks from a hard-anodized or polished finish
There are a few things to consider when using an electric water pump. If you are converting from a mechanical system you will need to address these concerns:
  • Ensure your vehicle’s electrical system is compatible (adequate amperage and voltage, proper grounding, relays to guarantee power delivery to each electrical component)
  • Electric fan(s) to replace a mechanical fan (if originally equipped)
  • Redesign or rearrange pulley and accessory drive system

THE MECHANICAL RADIATOR FAN and FAN CLUTCH

The standard engine cooling (radiator fan) on older vehicles is a mechanical type, meaning that it is belt-driven. In most cases the mechanical fan is mounted to the water pump snout and is driven off of the same pulley that rotates the water pump. The mechanical fan is very simple, and is quite effective for most applications. Mechanical fans are typically made of stamped steel, but some aftermarket fans can be made of reinforced fiberglass; stamped steel center section with riveted stainless blades; or plastic/nylon. Blade count varies by application, some have 4, 5, 6 or 7 blades.
 
Benefits of the mechanical fan is that it is cheap, it is simple, and it is always spinning. But these benefits can also be adverse affects. A fan that runs all the time takes power to turn it. Plus, this type of fan is not optimized to pull maximum air at all engine speeds. Where some fans may work great a cruising speeds, they may be horrible at idle speeds (like stop and go traffic), or restrictive and ineffective at higher engine speeds. Using an aftermarket fan increases airflow for better cooling, but at the expense of noise and additional power needed to turn it. Some fans, like those with riveted blades, can explode when operated at RPM levels common to a performance engine, and if this happens the flying pieces can damage other engine and vehicle components.
 
An acceptable street performance fan, and at many times good for street/strip use is to use a mechanical fan with a thermatic fan clutch. The fan clutch is designed to limit the engagement (sort of like a clutch or torque converter) at certain engine speeds or temperatures to improve performance (air movement) and reduce engine noise. A thermostatically controlled fan clutch employs either a bi-metal spring or an electrical control to adjust fan engagement in response to operating temperature. As engine coolant temperature rises within the radiator, the air passing through the radiator heats the spring coil on the fan clutch. As the spring is heated it allows a silicone fluid in the clutch to enter a chamber that causes an increase in tension within the clutch. This mechanical event reduces the slippage in the clutch and increases the engagement to where the fan is now spinning almost 1-to-1 (the same speed) as the fan clutch. Fan clutches are often rated by their turn percentage, a value that states the speed of the fan in relation to engine speed. The higher value (when hot) is best for cooling. As coolant temperatures decrease the fan clutch returns to its prior state of disengagement, allowing increased slip, offering increased fuel efficiency and quieter operation. On the “non-thermal” fan clutch the silicone fluid with a very high shearing capability is used to drive the fan and cool the engine at lower engine speeds. As RPM increases the drive fluid allows the fan clutch to slip, increasing engine efficiency when less fan-assisted air movement is needed due to higher vehicle speeds.
 
Because the fan clutch and water pump share a common shaft, if the fan clutch fails it will often take out (damage) the water pump bearing with it. To tell if a fan clutch is failing, examine these common symptoms, diagnosis, and testing procedures:
 
SYMPTOM #1– The fan clutch is loud, performance and engine efficiency have both decreased.
 
DIAGNOSIS – This is what happens if the fan clutch has locked up in heated position, or least amount of disengagement. The fan is spinning at the same speed as the engine at all times.
 
TESTING – With the engine OFF, carefully grasp a two blades on the fan (TIP: it is a good idea to wear gloves, for the blade edges are often sharp) and try to turn the fan. If there is excessive resistance or you cannot turn the fan at all the fan clutch needs to be replaced. Next, rock the fan forward and backward to check lateral play. You should feel a very SLIGHT amount, but not excessive.
 

SYMPTOM #2 – The engine is overheating at slow speeds, you may hear a growling noise when the engine is running that changes tone as to increase engine RPM.
 
DIAGNOSIS – The clutch has broken internally or the clutch has locked in the lower temperature position.
 
TESTING – This is a two part procedure, you will want to test the engine both cold and at normal operating temperatures.

A) Cold Testing: Grasp the fan blades as described above and spin the fan. It should spin, but there should be some resistance. If it is so loose you can spin it like a top and it keeps going it is defective. Now check the front-to-back lateral play. You may feel a considerable amount to the point of being clunky or popping. If so, the fan clutch must be replaced. 
B) Operating Temperature Testing: Grasp the fan blades and you should feel firm resistance, but the fan will still spin, but not freely. If it spins freely and there has been no change between cold and warmed testing, replace the clutch.


SYMPTOM #3 – The fan clutch has exploded (separated) into various pieces. Pretty obvious to see, as there will be parts missing and sometimes damage to other under hood components (the hood itself, radiator, belt(s), battery, and hoses).
 
DIAGNOSIS – This is usually caused by severe bearing failure where the fan clutch bearing has seized. While this can happen due to a component being either old and having surpassed its usable life, it can also be caused by abuse (excess RPM) or laziness, where the vehicle owner or mechanic did not periodically inspect the fan clutch for wear.
 
TESTING – Sorry, no testing procedure for this failure. Pick up the pieces, repair or replace the fan clutch (probably the water pump too), and any other component that was damaged.
 
Generally, average fan clutch output (efficiency) under normal operating conditions will decrease by about 200 RPM or so per year. This means that a three year old fan clutch is possibly due for replacement, or at least take the initiative to perform more periodic inspections. A fan clutch that has seen four years of use or more could be running partially disengaged and should be replaced. Periodic inspection is important! The lifespan of a fan clutch depends on the quality of the component and how the vehicle has been used and maintained.

The Electric Fan

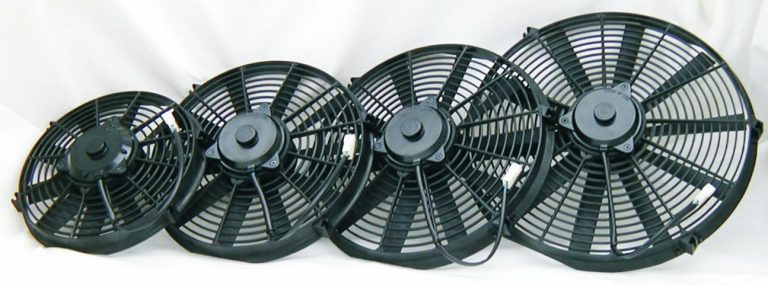
Meziere electric fans

Most new vehicles take advantage of electrical cooling fans as original equipment because of their smaller engine compartments and greater airflow demands. Mechanical fans are still common to pickups, SUVs, motorhomes, and other heavy duty applications. It is well known that an engine can cool itself as air passes through the radiator (no fan required) at cruising speeds of roughly 60 miles per hour in an average climate. Yet, with tighter under hood tolerances, unleaded fuels, higher combustion temperatures, forward mounted catalytic converters, and other heat-creating components and issues, a sole mechanical fan is not only impractical, but inefficient. In many modern vehicle applications the “60 mph cruising speed” example will not work, because some modern vehicle nose and engine bay designs simply do not have the natural airflow past the radiator available without some sort of fan in place and operating.

In the past, electrical cooling fans were simply “helper” fans for heavy towing and performance applications. The cooling system, engine, and vehicle designs still mandated the use of a mechanical fan to provide adequate cooling. But now, many enthusiasts are dumping their mechanical fans in favor of the more efficient electric counterparts. Noise is reduced, horsepower is gained, mechanical water pumps last longer, and more efficient low speed cooling are all benefits of the electric fan. Additionally, advances in engineering have produced electric fans that are considerably more cost effective and powerful than their predecessors. 
 
If you are exchanging a mechanical fan for an electric one, be aware that proper shrouding and managed airflow requirements are still an important concern. You cannot just mount an electric fan and think it will solve all your problems. Correct mounting location, fan shroud installation, the correct fan (or fans) to meet the airflow demand (calculated by engine horsepower, vehicle weight, altitude and load) are all equally important if you want to do it right. Many aftermarket fans are rated by horsepower, and do not be surprised if in many cases you cannot find the fan that meets your exact power requirements. The only trick I can offer is to cover as much surface area of the radiator as possible, which will likely mean multiple fans, and use a “puller” fan if it is your primary fan and a “pusher” if using it only as an auxiliary. Never use both a pusher and puller electric fan on the same radiator!

The Transmission Cooler

Most people do not realize that the transmission cooler affects the cooling system on many vehicle applications.
 
Over 90% of all automatic transmission failures are caused by heat. The hotter the automatic transmission fluid becomes, the more quickly it breaks down. Now, before you ask me why I included this in “cooling system tech” I would have to ask if you know that virtually all automatic transmission equipped vehicles run the transmission fluid coolant lines to the radiator? These lines run parallel to the actual engine coolant lines in your radiator with inner “sub tanks” within your radiator’s existing tanks. The problem here is that the transmission fluid often runs hotter than your engine coolant. This affects the ability of the radiator to transfer enough heat, requiring larger radiators and more airflow. You can do yourself a great benefit by adding a separate transmission cooler to your automatic transmission equipped vehicle.
 
The absolute minimum transmission cooler size for an average passenger car would be a 3/4″ thick by 6″ high by about 14″ across. In reality you should base your cooler demands by the vehicle weight, torque converter stall speed, intended use, and typical load applied to the vehicle. A mild street car can go with the minimum, but if you have a lock-up overdrive transmission, a torque converter with a higher that stock stall speed, a camper or tow some sort of trailer, the added load capacity or race environment, a much larger transmission and more efficient transmission fluid cooler should be installed.
 
You may bypass the radiator as the transmission fluid cooler, but make very sure you are using an independent cooler to replace it, one that meets the requirements and demand of the vehicle it is to be installed on. This addition of a separate cooler helps both your engine cooling system and the transmission perform better and last longer. This saves money, grief, stress, and frustration!  

Have questions regarding this information?

Our Online Support HelpDesk is available 24-Hours a day, 7-Days a week to assist you.

Or, call our dedicated support staff at (775) 746-4887

Phone support available between 8:00 am and 6:00 pm, Mon-Fri
Click Here for our HelpDesk